

Alan Wade and Frank Derwent
Last month we touched on building bees for the honey flow and examined the exigencies of swarm control. We glazed over the topic of requeening, a key way to keep your bees in really good shape and to prevent their swarming. Requeening is a topic we can now focus on and with considerable zeal. With advice from Des Cannon, provided at the recent Canberra Region Beekeepers’ (21 August 2019) club meeting, consider requeening in autumn rather than in spring. That is, of course, if you can wait and the queens you have are not already too old and overdue for replacement.
Autumn (March to May) is a better time to requeen. At this time the queens you purchase are almost certainly well mated, and you will be going into winter and the next season’s Spring with a young queen (which is just when you want this). You will need to factor in their seasonal availability from breeders and the present age of your queen stock. Our back yard and club queens are already well over twelve months old so we have our orders in and are going for broke with spring requeening. Rather than debate the merits of when and if to requeen, lets explore the ways of getting new queens into our hives.
Honey bees are well programmed and have developed a suite of queen succession plans over the last 60 million years or so. This is not a bad effort if they have practiced this once or twice a year over that vast timeframe. Honey bees emerged from a group of ‘pollen basket’ bees whose social lineage goes back around 90 million years. A good understanding of natural bee succession is essential if you want to requeen successfully.
We have all heard the sad tales of putting queens into hives because the original monarch couldn’t be found, and then finding the replacement dead, and the old girl strutting around the frames. How could have I have missed her?. If a queen is there and there is every indication she is present, that is you can see brood or in particular eggs and grubs (wet brood), never ever introduce that new caged queen. That narrative, and its wallet emptying consequences, simply doesn’t wash. There are several ways to determine if a queen is really present – she may not be laying and/or she may be elusive. We shall come back to these techniques shortly.
The techniques for requeening we describe here are straightforward using a caged queen purchased from a queen breeder. Additionally we have included a switchback technique, which removes the need to find the old queen in a strong hive, often a time consuming and difficult task at the best of times. This is included to show that there are quite innovative ways to make requeening efficient and effective. Also keep in mind there are other techniques that we haven’t covered, and they all have their adherents. It is just a matter of finding the method that best suits you.
So let’s start with the simplest of all methods, the swap-out ‘direct requeening’ technique, the one we all learnt in Beekeeping 101.
Direct requeening
Here we go back to basics and reflect on why the process of removing the old queen and putting a new queen into the hive – in the mailing cage she came in – works so remarkably well.
Step 1 Lift off any honey supers, remove the excluder, search and remove the old queen, and then dispatch her.
Simple as that. Any wily old hand will do a quick check of all other brood frames, or even carefully double check every frame in the brood nest, to ensure the absence of a second queen. We have come across three such colonies in the past couple of years at the club apiary, colonies actively replacing the old queen themselves in a process we call supersedure.
So checking all frames for a temporary extra queen is always well worth those few extra few minutes. Carelessly losing a new queen – because you missed one or thought the old one had gone when in fact she was still present – is never welcome news as your new queen will be almost invariably killed.
With the queen(s) removed, the colony quickly becomes queen-receptive rather than new-queen averse. In the absence of any further action, the now queen-free colony immediately commences preparations to raise a handful of emergency queens, only one of which will survive and mate. Here you step in and short-circuit the natural tendency of the hive to raise an emergency replacement queen [Figure 1] by introducing a fully functional laying queen.
Also at this time it is advisable to feed your bees 1:1 sugar syrup, particularly if there is a dearth in nectar flow. They react to this as if there were a nectar flow on, which makes them more receptive to the new queen.
Step 2 Supply a brand new gyne, that is a laying queen, in a mailing cage or a ripe queen cell, to greatly speed up the succession process.
Suspend caged queens in the centre of the brood nest adjacent to emerging sealed brood candy-end pointing upwards to avoid any risk of dead escorts blocking her release. Then gently pull the frames together but leave enough space for nurse bees to attend to the new queen through the fine gauze cage screen.
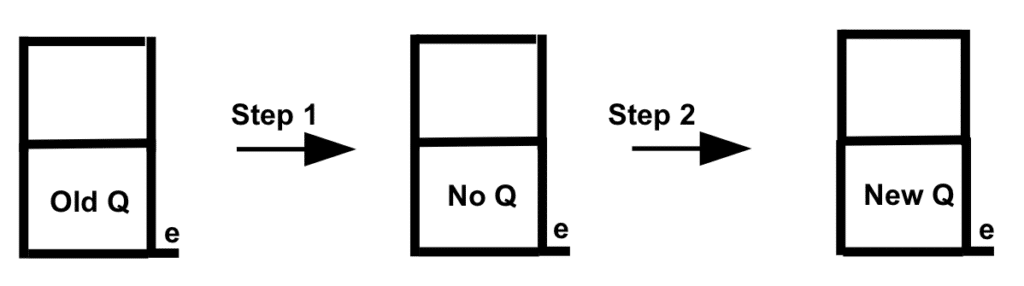
Figure 1: Direct requeening: e=entrance
Congratulations! You have got rid of the old girl, the one hardly up to baby factory duties. Within a week you will have a colony headed up by a vigorous young queen, far less likely to swarm and far more likely to return a large honey crop. While entirely optional, at the apiary we like to mark our queens using the international calendar colour scheme (5 colours, green this season right through to autumn). Des told us he he doesn’t follow this scheme and marks his bees hot pink or bright yellow. As long as your queens are marked it doesn’t matter what colour you use, as long as it is easy to see among the sea of bees. Marking makes for easier finding of queens and also tracks supersedure – or it you are inattentive – swarm queen replacement. Spot the unmarked queen!
Some drawbacks to requeening 101
But hang on. There is always a 5-10% chance the new queen won’t take in which case you have a serious problem. That is, there is no queen or you have some lingering doubts as to whether the new queen is actually present but has not yet started laying.
There is a simple remedy in this situation, one you should always employ any and every time you suspect your bees are queenless. Drop in a frame with eggs and young brood from another colony, that is after you have checked for disease in the donor hive. If no queen is present, the hive will promptly set to and raise a queen in just the same way that would have happened had you not attempted to introduce a queen. The tell-tale signs will be flared worker cells being reprogrammed to raise queens 24 h later.
Also, and most instructors omit to tell you this, the process of requeening will always result in a mild colony setback. Even with seamless queen replacement you have interrupted the queen laying process and lost a good part of a normal brood cycle, say a net loss of 2000-3000 bees.
However given time, say two brood cycles (six weeks), the new and more fecund queen, laying 1600 or more eggs per day, will more than make up for any losses. Requeening much closer to the honey flow will, however, limit your bees chance to take maximum advantage of that flow. The take home message is to autumn requeen or requeen as early in spring as possible. For early spring there is a trade off. The other part of the mated queen equation, drones, will take a month and 24 days raising time to mature if they are to mate queens successfully and avoid queens subject to early supersedure. In balance October is probably the earliest you can go for queens raised in southern Australia. In any case it is probably the first time queens will be readily available.
Requeening using a nucleus colony
It would be nice to think that you might keep the old girl laying and might not take the slight risk of making your hive queenless all in the name of trying to do the right thing, replacing a declining queen. Needless to say again there is a simple remedy. All you have to do is to ‘peel off’ a baby colony which we call a nuc. Nucs are small hives that typically fit into a single box with three to six frames. In the apiary we use the “Paradise” polystyrene supers as 6 frame nucs (these boxes can also be used as two 3 frame nucs). The queen is introduced to the nuc making quite sure that the old queen is left behind with the parent colony. The old queen will keep laying while the newly introduced queen can be inspected after ten-fourteen days to ensure she is well settled and in full lay.
Step 1 Using a strong colony move a few frames, including brood in all stages and some stores, to a new offset baby colony (a nuc) [Figure 2] .
Make sure there are enough bees in the new colony, shaking a few extra bees off brood combs – without the old queen – if needed. A frame of sealed emerging brood will quickly strengthen a nuc while brood at all stages will help ‘hold’ bees and limit their tendency to fly back to their old haunt.
Once the new queen is well settled – give her three weeks to have her own sealed and emerging brood – simply unite the unit with the new queen after removing the old queen. This can be done in a number of ways but the old standard of using a sheet of newspaper between the two stocks, old queen removed, works really well. Establishing nucs a day or two before queens are scheduled to arrive removes the pressure of having to find a large number of old queens all at the one time. The great fear dawns when the postie knocks on the door with ‘a remarkably small parcel containing an overly large number of queens’. We currently have thirty queens on order.
Step 2 Once well established paper on the unit with the new queen after removal the old queen.
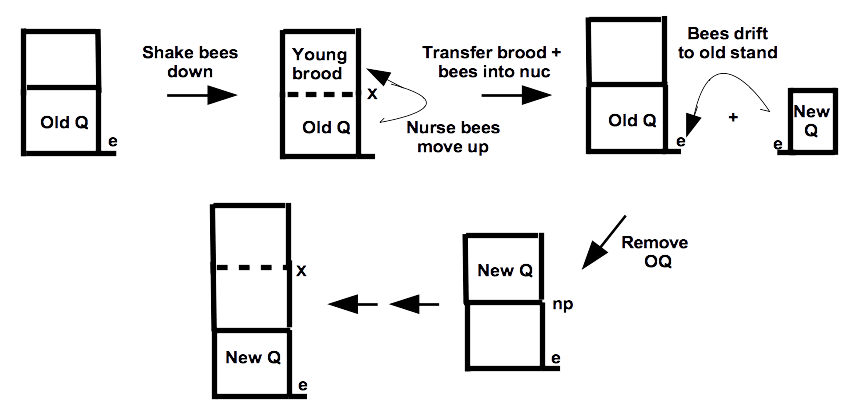
Figure 2: Requeening using a nuc: e=entrance, x=excluder, np=newspaper
Depending on what gear you have available you have a choice of either establishing an offset nuc – as above – or you can insert a nucleus (a split) board with a separate entrance on top of the colony saving any need to find an offset unit needing an extra lid and bottom board. This simple variant is shown in Figure 3. It’s simply a large nuc established on top of your hive that dispenses with the need to use non standard bee boxes and other gear.
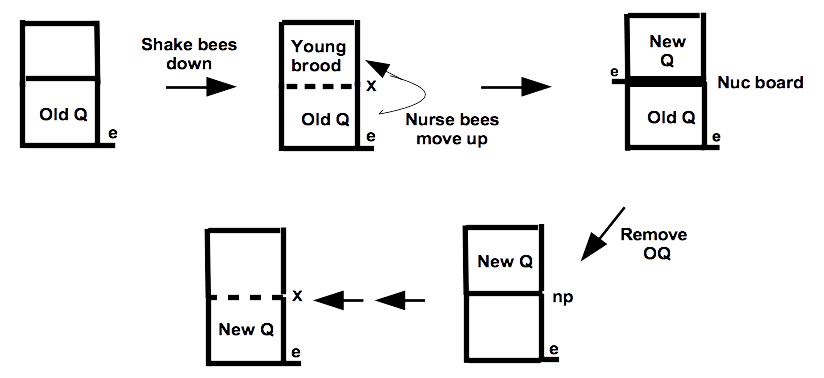
Figure 3: Requeening using a contrived nuc or split: e=entrance, x=excluder, np=newspaper
If you are a dab hand at finding queens or the colony is still not too crowded, you may easily find the queen averting the shakedown step.
There are several alternatives to newspapering on your newly established queen. You can remove the old queen and a couple of empty frames and, using a little smoke, drop the new queen in between several frames of brood and bees into the old brood nest. The queen with a protective shield of her own young bees will be readily accepted freeing up your nuc to receive another queen or deploy the residual stock to strengthen other hives.
In any case keeping a few spare nucs will always stand you in good stead. While they need regular attention, the queens in nucs will age only slowly since they do not need to work hard laying to support a large population. They will always be available to replace any underperforming or failing queen.
All said, we have improved our requeening technique by keeping the old queen laying and by considerably improving the chance of acceptance of new queens. However in this scheme of things we have still have put off the evil day of having to find the old queen. So if you have a strong cranky hive or a paddock full of hives bubbling over with bees you might flinch at the task. You can, however, adopt rather smarter tactics, ones that easily overcome this difficult task. Let’s explore one option.
Switchback requeening
Despite your best intentions, you have strong colonies that chase you every time you head up past the bees to the chook shed. More than likely you have left preparations for requeening to the very last moment, that is until the new queens have arrived in the post. Further, since you haven’t closely inspected your bees for years, you wonder whether you will get a hiding from stroppy girls when you lift the first lid.
Here entereth the armies of the Israelites and the Philistines. Thinkest thou canst smite the standing army with thine bows and arrows?
And there went out a champion out of the camp of the Philistines, named Goliath, of Gath, whose height was six cubits and a span. [Here we must deviate from the text and explain that Goliath was handsome 2.97 m, aka 9’9” gent.] And he had an helmet of brass upon his head, and he was armed with a coat of mail; and the weight of the coat was five thousand shekels (57 kg, a couple of supers of honey) of brass…
And David spake to the men… who is this uncircumcised Philistine, that he should defy the armies of the living God?… And the Philistine said to David, Come to me, and I will give thy flesh unto the fowls of the air, and to the beasts of the field…
And David put his hand in his bag, and took thence a stone, and slang it, and smote the Philistine in his forehead, that the stone sunk into his forehead; and he fell upon his face to the earth… and smote the Philistine, and slew him; but there was no sword in the hand of David.
Replacing that old queen under conditions where it seems that Goliath (your large and fearsome hive) has the upper hand requires stealth.
This brings to the fore the pièce de résistance of requeening practice. Switchback requeening simply isolates rather than removes the old queen, allows a new queen to be established and permits the old queen to keep laying. You make good preparations, you introduce the queens you’ve ordered within a couple of hours of their arrival, and you make time to complete the requeening process with minimal stress or fuss.
We start the scheme by replicating the first few steps depicted in Figure 3 using a double screen instead of a nuc board. It culminates with a juggling act that reorganises the hive so that the super with the new queen replaces the bottom brood box with the old queen that in turn is simply moved aside. Bees drift from this old unit making it easy to locate and remove the old queen. Once dequeened, this old unit is promptly united with the parent hive. The overall scheme is depicted in Figure 4.
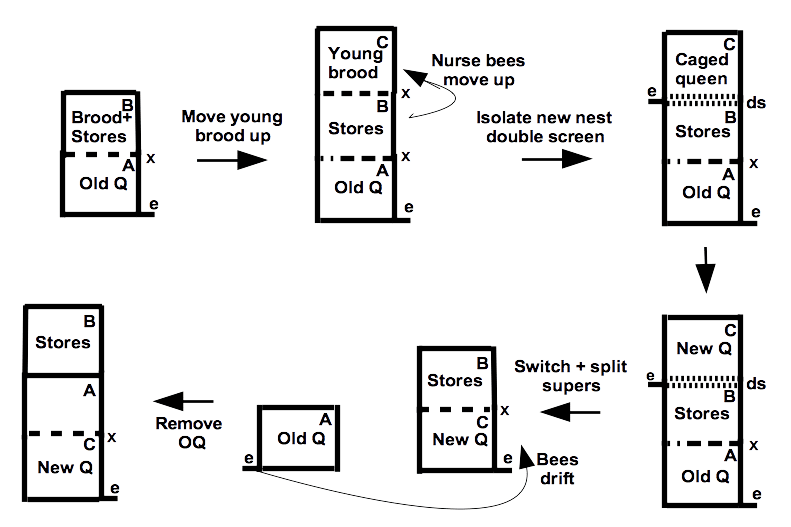
Figure 4: Switchback requeening: e=entrance, x=excluder, ds=double screen
This scheme is quite simple, capturing bee instincts to tend brood, to raise queens and to drift to a learned hive orientation. Switchback requeening, or some variant of it, is a scheme that could and perhaps should be routinely applied in all requeening operations, a scheme more dependent on understanding the behaviour of bees than following some cookbook recipe. It does, however, require strong hives that when split are capable of supporting a second queen.
Step 1 Shake bees down to the bottom super in the process lifting a few frames with stores and unsealed brood to the top of hive above a second excluder. Wait for a couple of hours for nurse bees to move up.
Step 2 Replace the excluder with a double screen and introduce the new queen.
The advantage of using a double screen over employing a standard nuc board is that the warmth from the lower brood nest will accelerate the establishment of the new upper brood nest and that the odours of the two colonies will be mixed avoiding the need to forcefully unite bees at a later stage. Using an upper queen excluder throughout will not work as one of the queens will almost always be lost, either killed by bees balling one of the queens or by losing one or both queens to swarming.
So far, so good. The difficult task of immediately finding the old queen has been averted, you have introduced a new queen and the old queen will continue to lay uninterrupted.
Step 3 Once the new queen is settled and laying well, offset the lower brood box with the old queen by several meters. Then swap the supers in the main hive so that the top super with the new queen occupies the former base position on the old parent queen stand, any honey supers being placed on top.
You have successfully requeened the colony without having to find the old queen, a conjuring trick we learnt from Victor Croker and David Leehumis at Australian Honeybee.
However, for the sake of marital harmony, we recommend that you don’t build the offset single hive with the old queen to ‘yet another hive’. That is, unless you decide you need a few nucs as backup colonies (ones you can also requeen). It’s a good idea to have a few ‘idle spares’ if things go awry with your production hives.
But we are not finished. As field and any guard bees bees will quickly drift back from an offset colonies with the old queen to the parent hive stand, finding old queen will suddenly become as easy as pie.
Step 4 After waiting an hour or two, quickly search and remove the old queen from the much weakened offset colony. Then simply place the dequeened colony on top of the brood nest with the new queen – juxtaposing all brood – and placing any honey supers on top.
No special precautions are needed to unite bees as the bees have a common odour. The whole caboodle comes down to a simple reorganisation of supers and very timely removal of the old queen.
You have now have requeened your bees without searching giant hives and without any interruption to the brood cycle. An unstated spinoff comes in the form of splitting the brood nest (moving brood up). In most respects this simple action replicates George Demaree’s 1892 plan for swarm prevention. This all distills to an ideal time to employ bees ‘surplus to requirement’s to host a new queen. The scheme may sound complex but it is really very simple and of course the whole caboodle has a new queen making it less swarm prone.
Employing queen cells in lieu of mated caged queens
There are other similar schemes, especially those employing queen cells instead of mated queens. We will leave cell introduction to another time, a sometimes superior and simpler method of requeening, because that would normally involve raising queens yourself. That is a whole new topic though the same techniques we have described above will work well.
The alternative of obtaining well-raised cells from a commercial queen breeder has its own problems not least having them safely transported and in a timely manner. The prospect of finding well built supersedure cells, ones you may come across amongst your own hives, might suffice to requeen a handful of hives. However unless you are very well prepared and know what you are doing that effort, too, may end in failure.
Nevertheless we thought you might want to be appraised of some of the pitfalls of cell requeening before heading down that track. Obtaining well raised queens cells raised from good stock apart, other practical considerations will include the fact that:
- not all queens will be successfully mated;
- while queen cells, unlike mated queens, need no protection, they require very careful handling as they are very sensitive to jarring and like all brood, any temperature shock;
- in the absence of mating queens in an isolated apiary – flooded with mature drones from mother colonies headed by your own select stock – only some queens will perform well and have tractable progeny; and
- nuclei surplus to immediate needs will be needed to accept spare cells to provide contingency for queen mating failures.
King David’s Victory
Now if your colony is looking strong and it’s already October, don’t forget to give any colony with a new queen ample room to lay by moving a few frames of sealed brood up just above the excluder and by also providing space for your bees to ripen and store honey. In a good season you may have to move earlier, to provide room that is. In the present prospect of a poor season, simply make sure your bees have adequate stores to keep the colonies ticking over or unite colonies removing queens from poorly progressing colonies in the hope that conditions may improve. With luck you may get a good, if brief, honey flow and some return for your requeening effort.
Other ways
Are there simpler options for introducing a new queen? This assumes you are intent on quick requeening using the classical remove and replace technique?
Yes, of course. During a very strong honey flow you can simply take out an old queen and walk in a new mailed queen, that is after you have removed her from her cage. While sprayed on essential oils such as vanilla may be used to help mask queen pheromonal signalling smoke alone will do the trick. We really don’t recommend this walk in strategy though the new queen may start laying almost immediately. However the walk in principle, is one that should only be practiced in a strong honey flow, gives us a simple cue. Feed your bees liberally with a light 1:1 sugar water mix to simulate a honey flow a day or two prior to introducing a caged queen to improve the chance of her being accepted. Otherwise try to introduce queens under good conditions.
Young, just emerged nurse bees, will accept any queen. Simply take out a few frames of brood from a strong hive along with some stores and put them in a nuc – first shaking off most of the bees from brood frames to reduce the risk of transferring the queen and to remove older bees. Then introduce your mailed queen – ideally without escort bees using the push in cage technique (Figure 5) – to the baby colony rather than any colony that you’ve simply dequeened. The percentage take is improved markedly and would be the type of requeening you would resort to if buying in a $500 AI breeder queen.
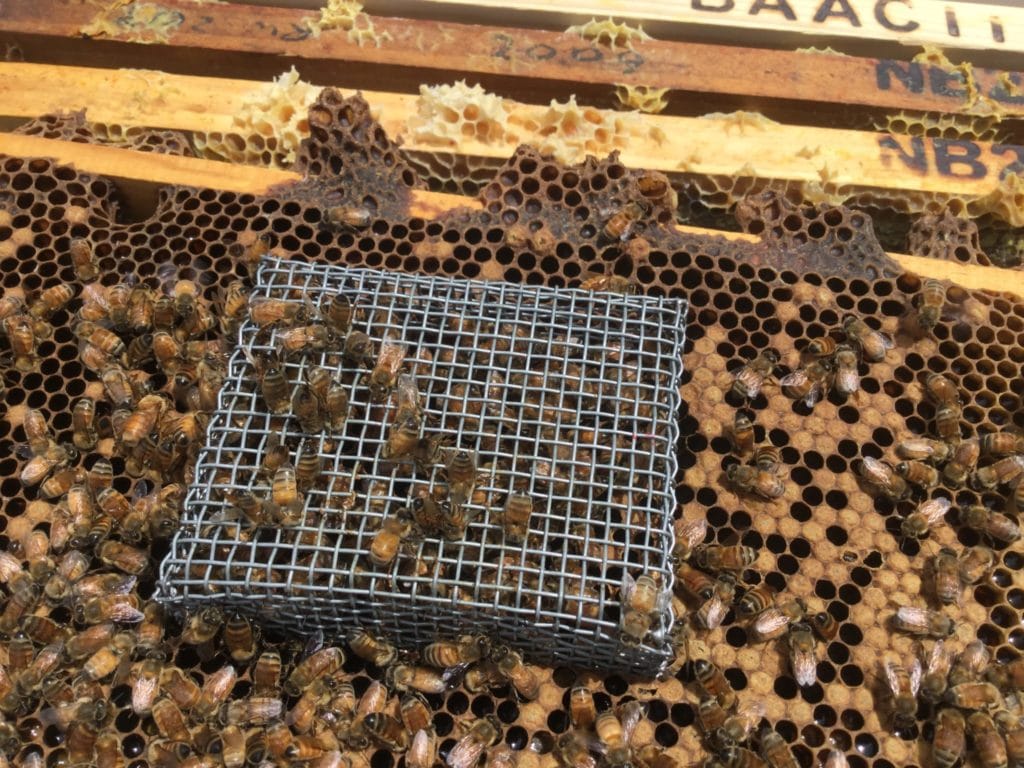
Figure 5 The push in cage technique
To introduce a queen using a push in cage:
- remove the queen from her mailing cage in secure enclosure – say under a net – taking care not to let her escape and discard attendants;
- mark the queen using a Posca Pen or using a special marking kit;
- locate the screen over emerging brood under screen (shown) gently pushing open edge into comb face;
- mark the frame top bar with the cage clearly with date and arrow showing location of the cage;
- after two to three days lightly smoke colony, prise adjacent frames gently sideways and very carefully lift the marked frame;
- gently remove cage, watch the queen walk away and quickly and gently reassemble hive; and
- leave colony undisturbed but check queen is laying about two weeks later.
Finally, while you may be anxious to find out whether the queen you have introduced has taken and is laying, always give any new queen plenty of time to settle and be fully accepted. However, don’t wait for more than two-three weeks as you can then not be quite certain that the hive has not raised its own queen and that it is the one you introduced. However disturbing the colony too soon (less that 7-10 days) may signal to the bees that she needs to be removed whether or not the colony is in a position to raise its own new queen. A queen that would have been accepted had you left the colony alone will be at risk if you jumble the bees too much searching to find her.
David Leemhuis and Victor Croker from Australian Honeybee, whom we would like to thank for ideas for switchback requeening and for inspiration, mainly use queen cells and have some other requeening tricks up their sleeves. The rules of successful requeening using queen cells are somewhat different to those outlined for caged queen introductions so consult those oracles if you would like to know more.
Be the first to comment