Join Now
Members Area
Log In
Club Equipment
Association Extracting Equipment
Wax Presses for Loan
Committee Elections & Results
Monthly Meetings
News
Courses
Classifieds
Browse Ads
Search Ads
Reply To Ad
Bee Swarms
Bee Swarm Collector List
Bee Colony Collector List
Contact Us
News Ticker
[ 12/04/2024 ]
Bee Buzz Box May 2024 Mite Bee Part II – How the Mitey have Fallen
Apiary
[ 25/03/2024 ]
Bee Buzz Box April 2024 Mite Bee Part I – A Varroa Control Guide
Apiary
[ 28/02/2024 ]
Bee Buzz Box March 2024 The Social Life of Bees – Part V The Corbiculate Bees
Apiary
[ 02/01/2024 ]
Bee Buzz Box February 2023 The Social Life of Bees Part IV – Corbiculate Bee Origins
Apiary
[ 23/10/2023 ]
Bee Buzz Box November 2023 The Social Life of Bees Part III – The Carpenter Bees
Apiary
Home
Media
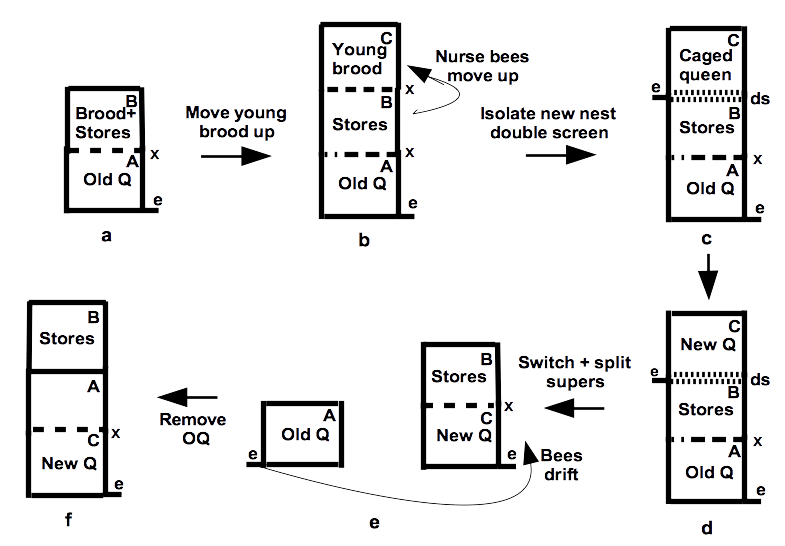
David and Goliath switchback Figure C
David and Goliath switchback Figure C
Previous
Next
Be the first to comment
Leave a Reply
Cancel reply
You must be
logged in
to post a comment.

Be the first to comment